So, you've decided to step into the shoes of an all-round home builder and take your woodworking game to the next level with a Dewalt table saw. Before you can dive into your DIY adventure, let's tackle the task of installing a riving knife. Don't worry, it's a crucial step in ensuring your safety and the quality of your cuts, and I've got all the tips you need to get it done like a pro. So, grab your tools and let's make sure your saw is equipped with a riving knife for those precise cuts.
Here's how to get the riving knife installed without breaking a sweat:
- Safety First: Before you start any work on your table saw, make sure it's turned off and unplugged. Safety goggles and gloves are a must to protect your eyes and hands.
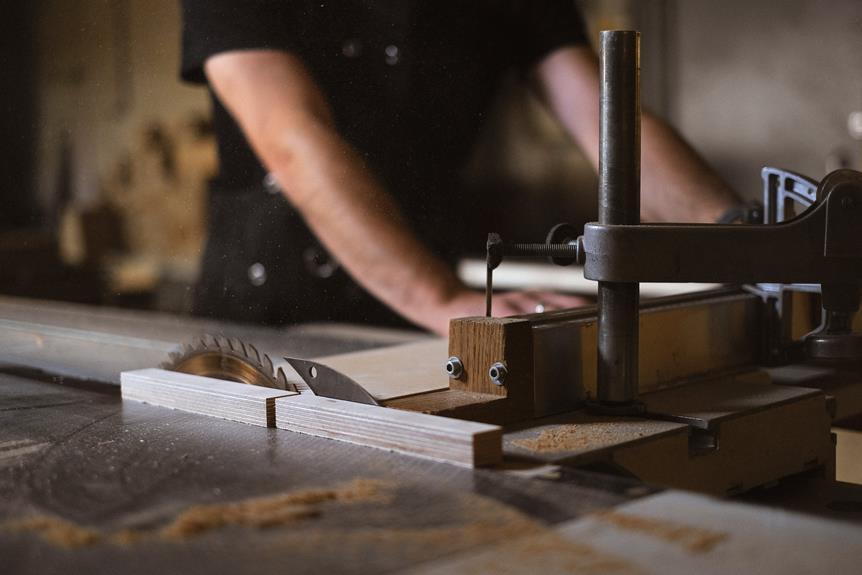
- Locate the Riving Knife Slot: Check your table saw's user manual to find the specific location for installing the riving knife. It's usually located behind the blade, so you may need to tilt the blade to access the slot.
- Choose the Right Knife: Ensure that the riving knife you have is compatible with your Dewalt table saw. It should fit snugly into the designated slot and be the appropriate size for your saw.
- Adjust the Blade Height: Lower the blade to its lowest position to create enough space for the riving knife to slide into place.
- Slide in the Riving Knife: Carefully slide the riving knife into the designated slot, ensuring that it aligns properly with the blade. It should sit flush against the table saw surface.
- Secure in Place: Once the riving knife is in position, tighten the locking mechanism to secure it in place. Ensure that it's firmly held and doesn't wobble.
- Test the Alignment: After installation, turn on the saw and check the alignment of the riving knife with the blade. It should run parallel to the blade for effective operation.
- Make Adjustments if Necessary: If the riving knife isn't aligned properly, make the necessary adjustments according to the user manual instructions.
- Final Safety Check: Before you start using the table saw for your woodworking projects, double-check that the riving knife is securely in place and aligned correctly.
By following these steps, you'll have your Dewalt table saw equipped with a riving knife in no time. Now you're all set to make precise cuts and take your woodworking skills to new heights. Safety first, and happy building! �️
Necessary Tools for Installation
Grab your trusty flathead screwdriver and handy Allen wrench set – it's time to get down to business and install that DeWalt riving knife!
First off, let's talk about the star of the show – the riving knife. This bad boy is essential for keeping your wood from pinching and binding, which can lead to nasty kickback.
So, you're going to need these tools to ensure a smooth installation process. Your flathead screwdriver will come in handy for adjusting any screws or bolts that secure the riving knife in place. The Allen wrench set will be your best friend for tightening and securing those hard-to-reach bolts.
Now, let's not forget the safety goggles and work gloves. You'll want to protect those peepers and keep your hands safe from any sharp edges during the installation. Safety first, my friend!
With the right tools and a bit of elbow grease, you'll have that riving knife installed in no time, and your table saw will be safer and more efficient than ever before.
Riving Knife Installation Tools
If you want to make the riving knife installation process a breeze, having the right tools at your disposal is key. Below are the essential riving knife installation tools you'll need to ensure a smooth and safe installation on your DeWalt table saw:
| Essential Tools | Description | Practical Tip |
|---|---|---|
| Socket Wrench | Use a socket wrench | Opt for a ratcheting wrench for easier handling. |
| Hex Key Set | Secure hex bolts | Keep a variety of sizes on hand to fit different bolts. |
| Adjustable Wrench | Tighten retaining bolt | Choose a wrench with a comfortable grip for better control. |
| Screwdriver | Adjust riving knife | Consider a magnetic screwdriver to prevent dropping screws. |
Having these tools readily available will make the riving knife installation process efficient and hassle-free. Remember to always prioritize safety when working with power tools, and double-check that the table saw is unplugged before starting the installation. With the right tools and precautions in place, you'll be on your way to seamlessly installing the riving knife on your DeWalt table saw.
Riving Knife Components Needed
To ensure a smooth and successful riving knife installation on your DeWalt table saw, gather the necessary components listed below for a hassle-free experience.
- New riving knife specific to the model of the DeWalt table saw
- Wrench or socket set for removing and installing retaining bolts
- Safety goggles for eye protection during installation
- Work gloves for handling the riving knife and bolts
Now that you're all set with the tools required for the riving knife installation, it's time to grab the specific components needed.
First off, make sure you have the right riving knife for your DeWalt table saw – it's like matching socks, you wouldn't want to mix them up! Then, get your hands on a trusty wrench or socket set to tackle those retaining bolts.
Don't forget your safety goggles – protecting those peepers is crucial. And of course, don't be caught bare-handed, grab those work gloves for handling the riving knife and bolts.
Oh, and it wouldn't hurt to have the owner's manual nearby for reference – it's like having your own personal installation guide.
Now, let's get ready to rock and rive!
Riving Knife Attachment Process
Before you start the riving knife attachment process, make sure to turn off and unplug your Dewalt DW 745 table saw to ensure safety.
Now, let's get down to business and attach that riving knife like a pro!
- Loosen the retaining bolts and push the bolt to release the pin in the housing to create space for the knife change. It's like a little puzzle, but you've got this!
- Securely drop the new riving knife into place and tighten the bolt to hold it firmly. Think of it as tucking in the riving knife for a snug nap.
- Double-check the tightness of the bolt and confirm that the riving knife is properly positioned before use. You don't want it to be wonky when you're in the middle of a project.
- Always prioritize safety by regularly inspecting and maintaining the riving knife, and follow proper procedures for installation and removal. A happy riving knife means a happy woodworker!
Now, go show that riving knife who's boss and enjoy the peace of mind that comes with a properly attached safety device.
Riving Knife Safety Tips
Make sure you've got your table saw unplugged and your game face on, because we're diving into some riving knife safety tips!
The first rule of riving knife club is: always turn off and unplug the table saw before you start tinkering with the riving knife. No one needs any unexpected surprises from a saw that's ready to party when you're not.
Second, use the right tools and techniques to securely install and adjust the riving knife. No hammering or makeshift tools, please. Regularly inspect the knife and its positioning for safety. You wouldn't want it to suddenly decide it's had enough and take an unannounced vacation mid-cut.
Also, be cautious of the retaining bolt behind the blind when prepping for the knife change. That little bolt holds more power than you might think.
Remember, safety should always be a top priority when working with power tools. We want all your fingers and limbs intact for future woodworking adventures.
Now, go forth and rive like a safety-conscious pro!
Conclusion
Congratulations on installing the riving knife on your Dewalt table saw! Now, it's time to step into the shoes of an all-round home builder and put that saw to good use. Remember, safety always comes first, so before you start cutting, double-check everything to ensure a safe work environment.
Now, let's dive into the world of home building and make some sawdust fly! You've got the riving knife installed, so go ahead and show off your handy work. And hey, if you ever need to change the knife again, you're a pro at it now!
Get ready to adopt the role of an all-round builder and keep on sawing safely!